tl;dr If you're getting the error "No space left on device" that prevents you from starting Docker for Mac, you need to resize your Docker for Mac image. Steps below.
In trying to put together a code example showing bad Docker performance on MacOS when booting an application that serves many small files, I accidentally ran my Docker for Mac VM completely out of space.
Normally getting a "No space left on device" isn't a big deal in Docker on a Mac device. You can either clear out space by pruning some volumes/images/whatever is taking up space, or you can resize your Docker for Mac instance through the "Preferences" screen.
However, in my case after a system restart I was unable to start Docker for Mac, presumably because the underlying virtual machine (the hypervisor that runs Docker) was SO out of space, it couldn't bootstrap! This meant I could neither run docker itself to clear out space OR use the GUI to resize the image.
To make matters worse, I didn't want to uninstall my entire Docker instance, since I still had some images running that would take time to replace.
Fortunately, the solution wasn't too painful. These are the steps I took to fix the problem and get Docker for Mac running again.
# 1. Find your Docker.raw
cd ~/Library/Containers/com.docker.docker/Data/vms/0/data
ls
You should see a Docker.raw here. this location should be consistent as of this writting, but you'll notice that older guides mention a Docker.qemu2...that's either out of date now or only relevant when Docker for Mac is running (which we're assuming it's not in this guide, otherwise you wouldn't have this problem).
# 2. Install gparted + qemu
For gparted, go to http://gparted.org/download.php and select the most recent amd64 release.
For qemu, Homebrew (opens new window) should have you covered:
brew update
brew install qemu
# 3. Use qemu to resize the image and start the virtual environment
These commands basically create a new partition with extra space within the virtual environment Docker runs within:
qemu-img info Docker.raw   # shows you current disk size
qemu-img resize Docker.raw +20G  # make it 20GB larger
qemu-img info Docker.raw    # check the new size
qemu-system-x86_64 -drive file=Docker.raw  -m 512 -cdrom ~/Downloads/gparted-live-WHATEVERYOURVERSIONIS -boot d -device usb-mouse -usb
# 4. Use gparted to merge that partition with your existing one.
Here are the instructions from the original guide (opens new window) I followed, which are still true:
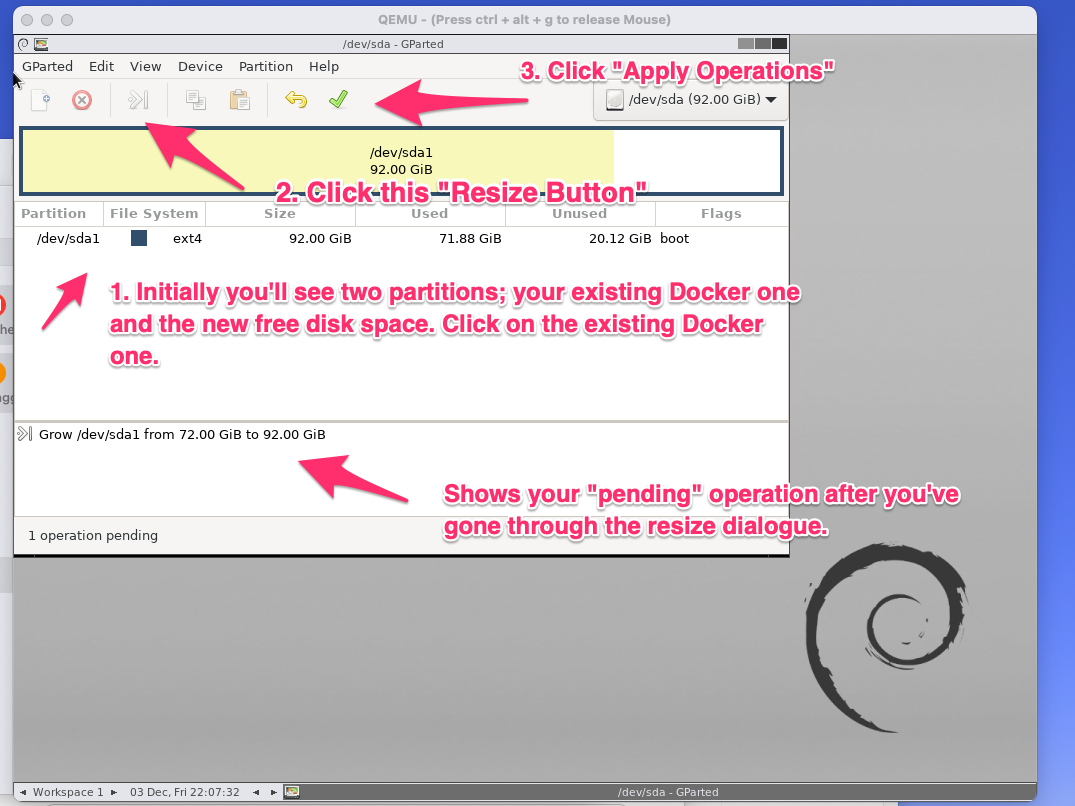
Wait for the VM to boot (can take a long time). For any questions asked (boot option, keyboard layout, language) the default is ok. Double click the gparted Icon. You should see swap space, the main partition and 100GB of free space. Select the main partition. Click Resize in the toolbar and drag the partition limit to fill the whole space. Click Apply. Wait for it to finish resizing and then quit the app and shutdown the gparted machine. Now start Docker for Mac again.
I foolishly didn't take good screenshots, but here's one that shows the steps once you get gparted running:
# 5. Restart Docker for Mac
If all has gone well, you should now have extra space and no more errors!
I reconstructed my steps from this old gist, 99% of credit goes to the good folks who made it: https://gist.github.com/stefanfoulis/5bd226b25fa0d4baedc4803fc002829e